I live in suburbia, which means I've got a garage (or a carhole, if you’re not so fancy). It's a detached garage, so part of my nightly routine when I check to make sure the house is all locked up is to peek out the back window. I like to know the garage door is closed and our cars are tucked in safely.
But actually looking out a window with my stupid analog eyeballs is lame, so I figured I could make things easier by adding some smarts to my garage. The first thing I did was use this fellow’s instructions (the original site is sadly offline, but the Wayback Machine is forever) to cobble together a Raspberry Pi-based solution that would fire off an email every time the garage door opened or closed. I couldn’t remotely open or close the door from inside the house myself (well, I mean, I could with the actual garage door opener remote control), but I could just glance at my inbox to see if the garage door was open or shut in the evenings.
This worked great for a couple of years, until Texas summers murdered the poor Pi. (This was possibly my fault, too, because of the PoE hat that I’d slapped onto the Pi, which resulted in extra heat.) So, I was back to peeking out my window to check on the garage in the evenings. Like a sucker.
There had to be a better way.
Insultingly, offensively awful OEM solutions
I had just two requirements in my search for that better way. First, whatever automation solution I settled on had to be compatible with my garage door opener. Secondly, anything I looked at needed to interoperate with Apple's HomeKit, my preferred home automation ecosystem.
The first thing I looked at—and quickly discarded—was using my garage door opener’s built-in automation functionality. My particular garage door opener is a LiftMaster, which means that it's part of a big group of garage door opener brands under the "Chamberlain" banner. The OEM-sanctioned way to do what I want, therefore, is to use Chamberlain's "MyQ" solution, which—and I am being generous here—is total garbage.
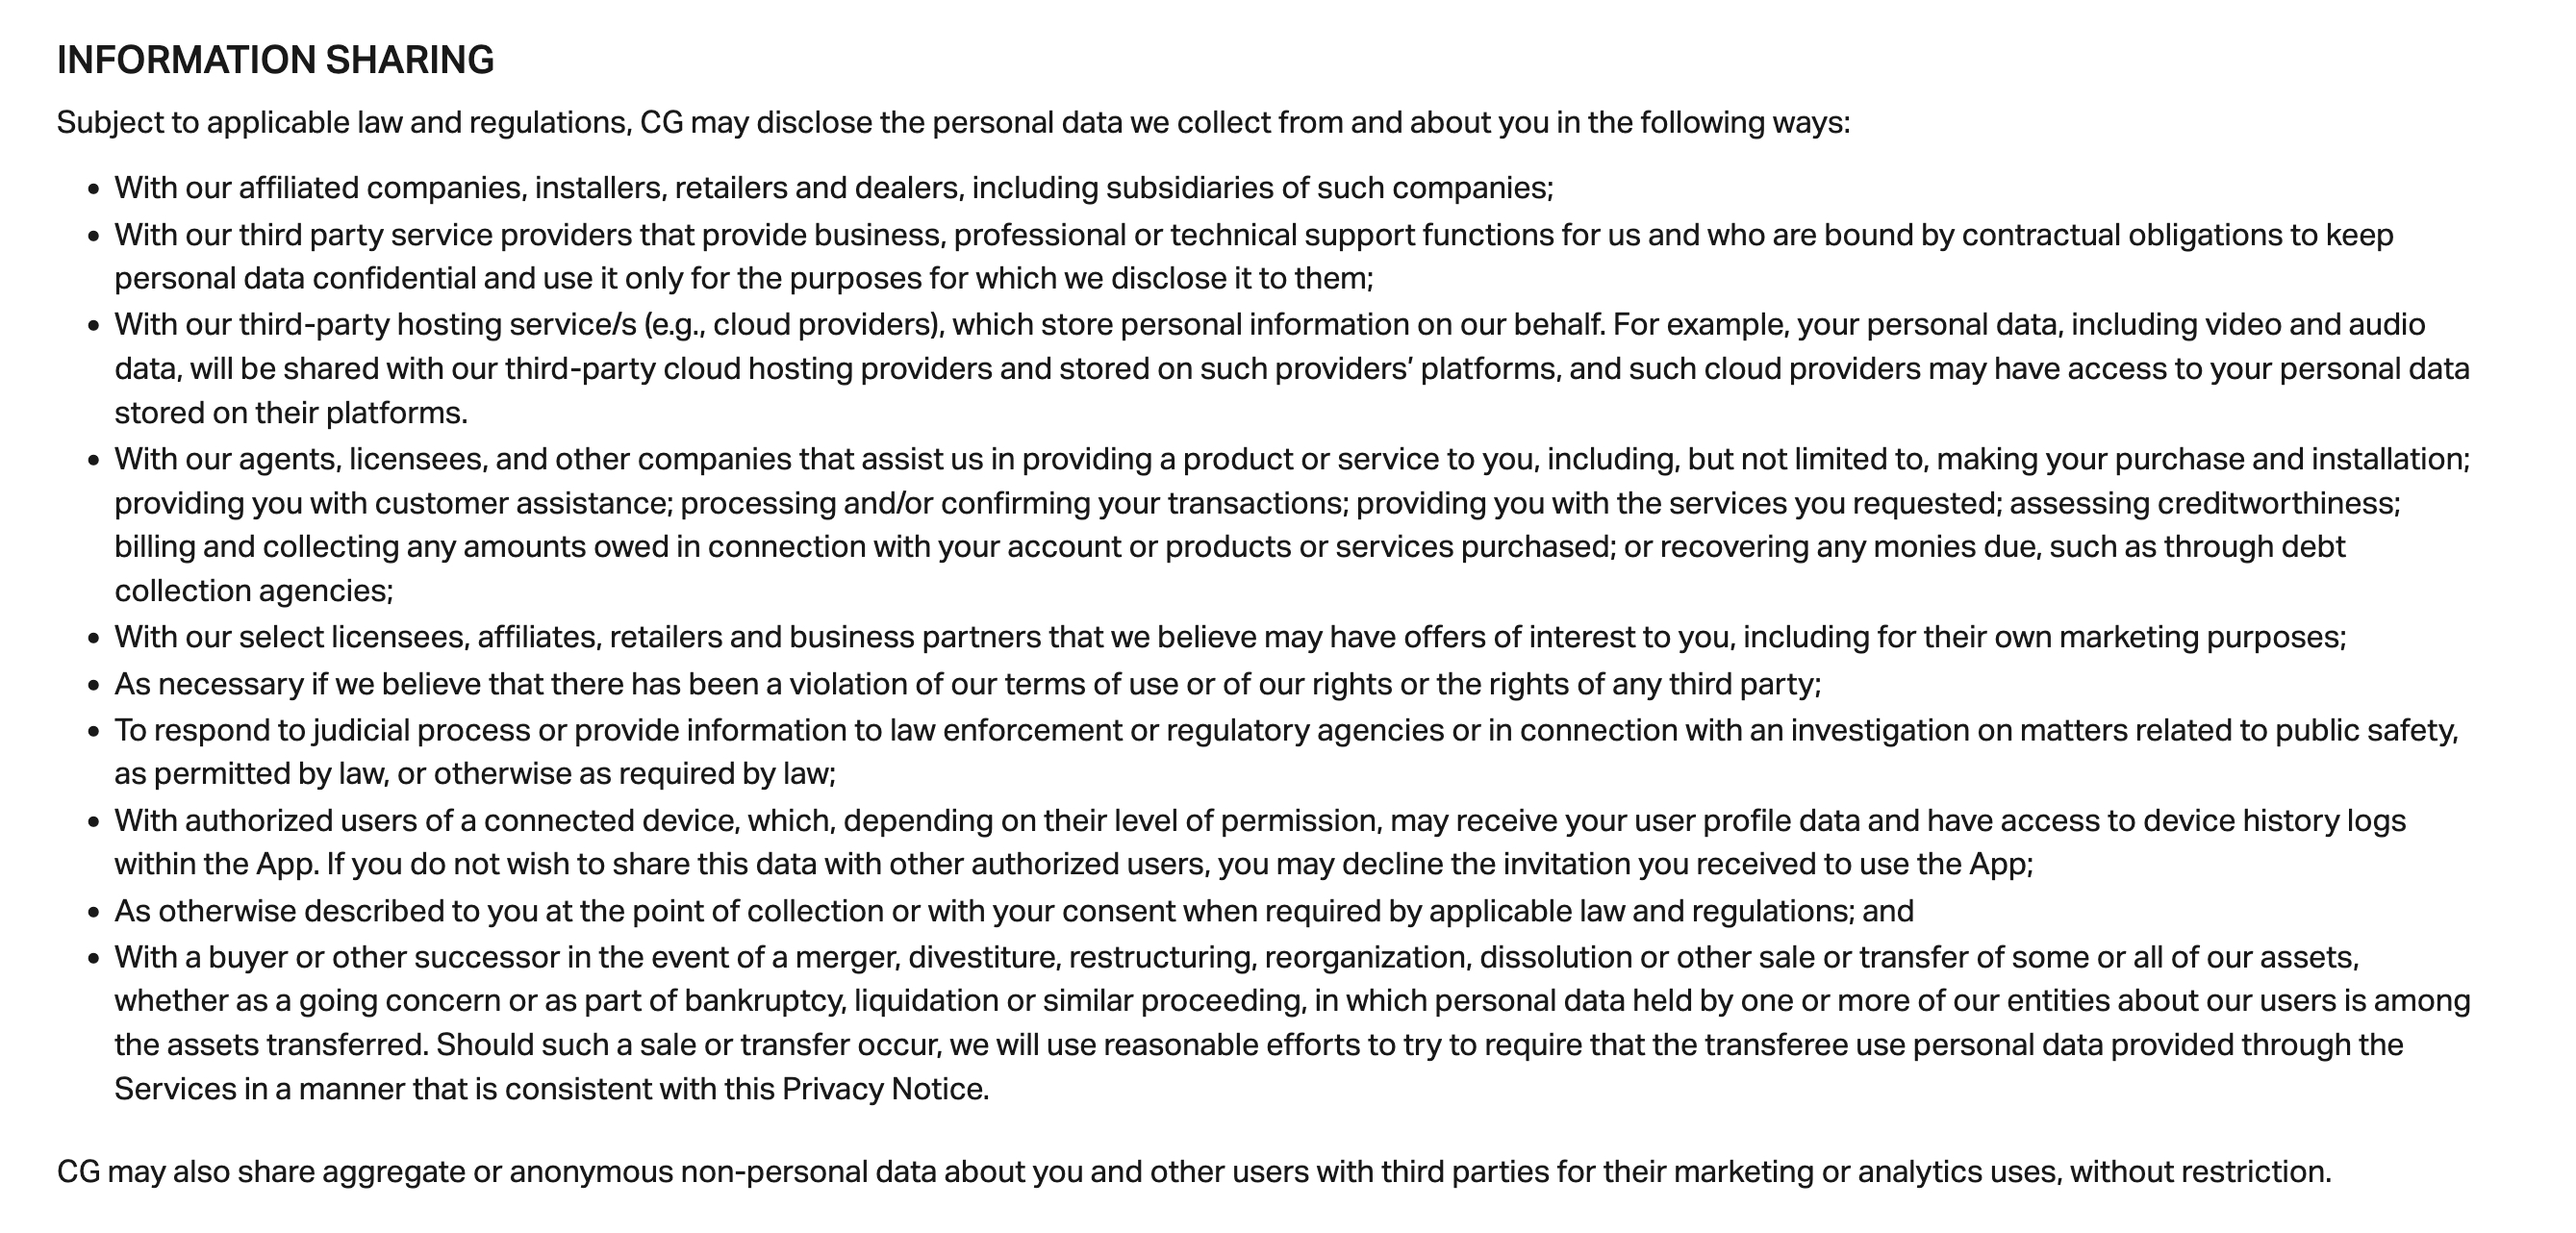
privacy page. It's about as gross as you might expect.">privacy page. It's about as gross as you might expect." src="https://cdn.arstechnica.net/wp-content/uploads/2024/09/ratgdomyqprivacy.jpg" width="640" height="306" srcset="https://cdn.arstechnica.net/wp-content/uploads/2024/09/ratgdomyqprivacy.jpg 2x">
Enlarge/ A snippet from the MyQ privacy page. It's about as gross as you might expect.
That’s gonna be a "no" from me, dawg. I’d rather jam bamboo under my fingernails than install Chamberlain's worthless app just for the privilege of controlling an accessory in my own home while facing the potential risk of having my personal information sold to enrich some vampire capitalists.
So what else to do?
Third parties to the rescue
Fortunately for me, a plethora of third-party solutions fill this niche very well without having to compromise with any of the MyQ crap.
Rather than trying to interface with MyQ on either the garage door opener or the MyQ service side of things, most third-party solutions work by wiring directly into the garage door opener and taking over the automation side of things. They can connect wirelessly to your Wi-Fi and advertise their services to HomeKit (or Google Home or Home Assistant or whatever your preferred home automation solution happens to be) directly.
So I spent a bit of time comparing the competitive landscape. The most-recommended garage door automation tools include offerings from Meross (which I almost purchased), Tailwind, and iSmartGate; up to a few months ago, one could also stand up a Homebridge instance and use a plugin to add MyQ support, but as of earlier this year the MyQ service has tightened up its API and Homebridge no longer works.
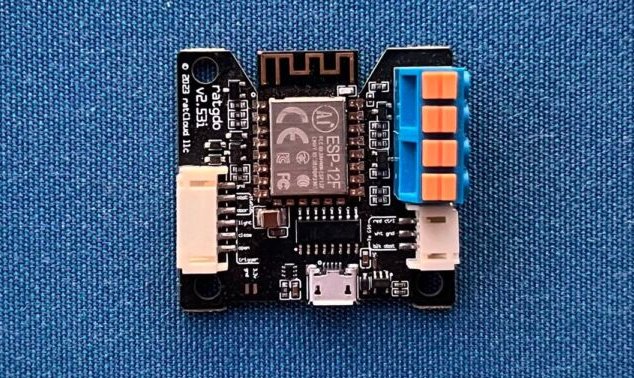
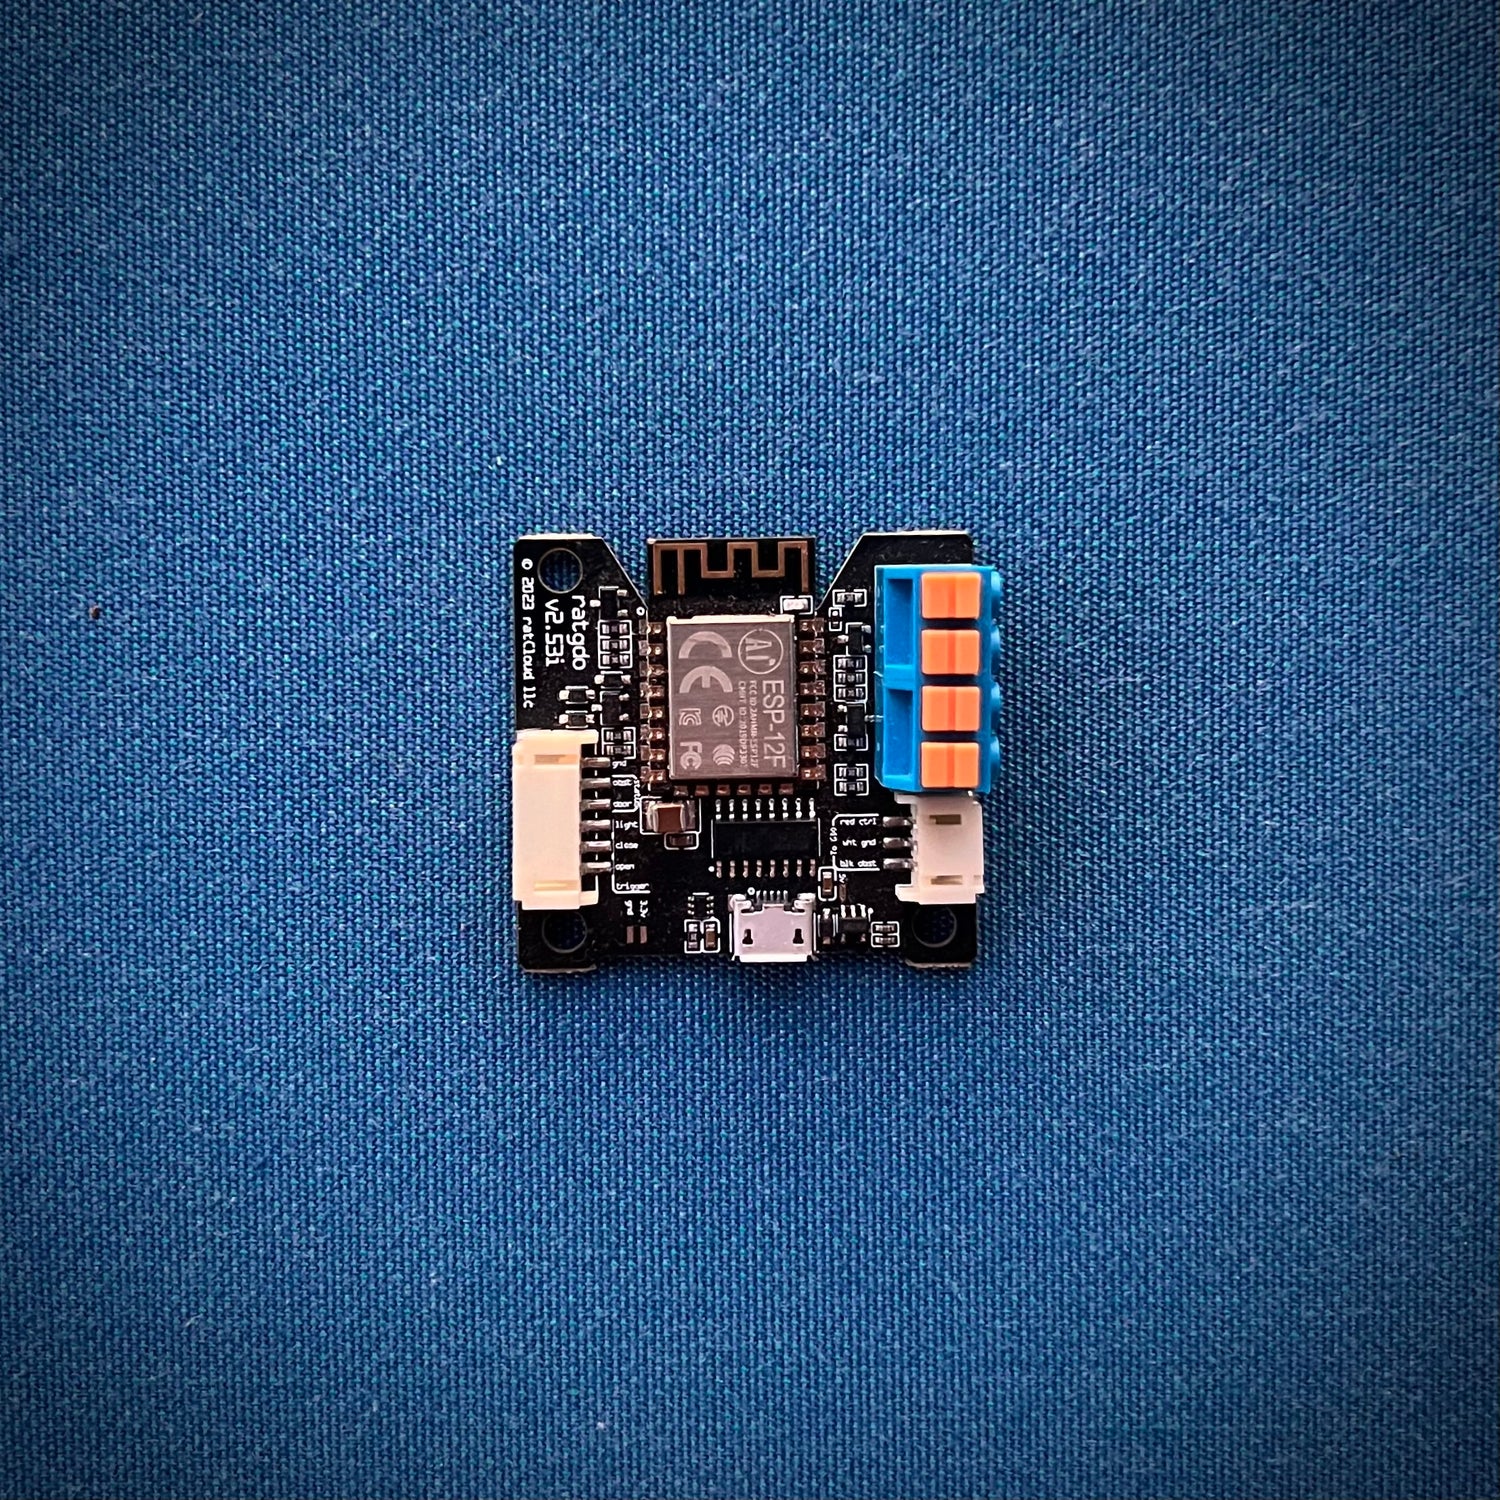
The option I ended up picking, though, was a ratgdo—a tiny little board with built-in Wi-Fi that gets wired in to the garage door opener’s terminals.
Rage, rage against the closing of the door
There’s a lot more to the ratgdo (which, according to creator Paul Wieland, stands for "rage against the garage door opener") than just HomeKit integration. The device works with ESPHome and speaks MQTT, both of which mean that ratgdo works out of the box with not just Home Assistant but (through it) pretty much every major home automation service.
There are caveats, of course. As garage door opener security standards evolve, so too must third-party devices like the ratgdo. The current version of the device works with Chamberlain openers that use the company’s "Security + 2.0" and older standards, and it requires different types of firmware to be loaded depending on the home automation service you intend to use.
Fortunately for me, given that my 2022-era garage door opener is somewhat new but not, like, brand new (it’s this model right here), Security + 2.0 support was exactly what I needed. My ratgdo order went in on a Saturday, and late the following week, I had the thing in my hands.
(A quick caveat: For folks who want to tinker just a bit harder, there's also a bunch of other stuff the ratgdo can do that I'm not doing—it comes with a wiring harness for connecting with lots of other types of garage door or gate openers, and as mentioned, by virtue of it being a local device you can load with different firmware packages, it can hook up to more home automation solutions than simply HomeKit. But I didn't do any of that stuff.)
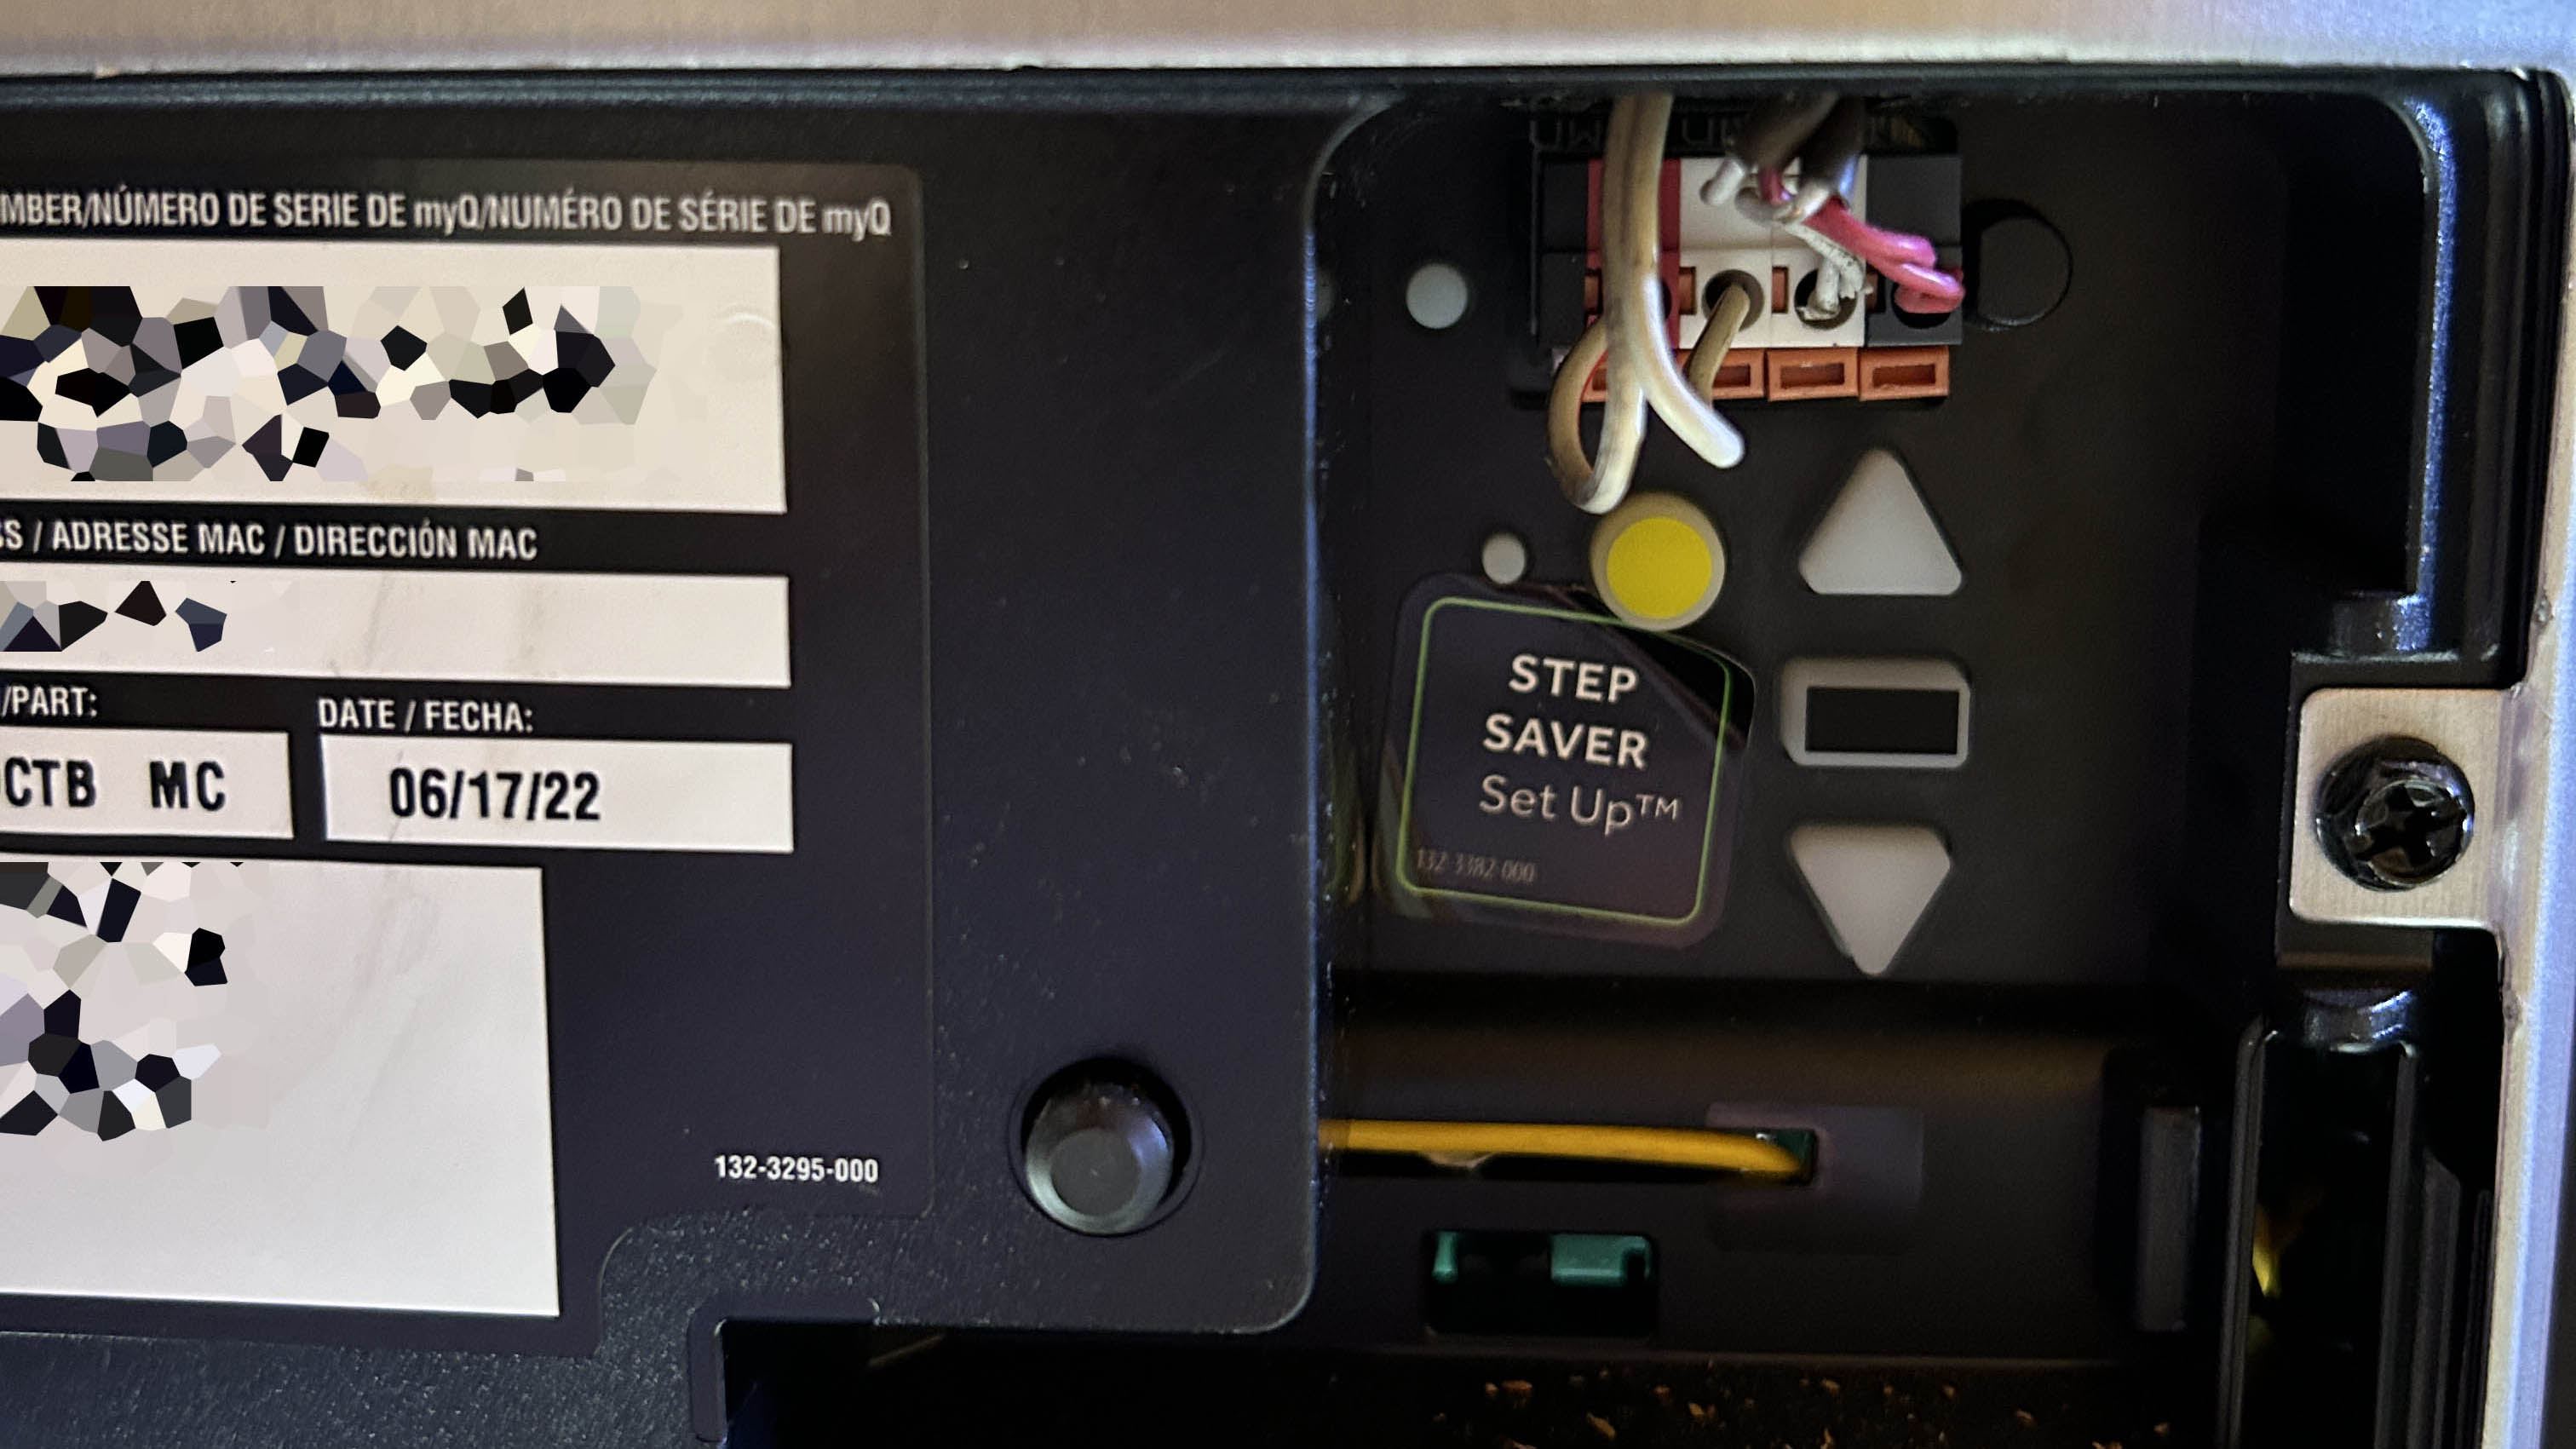
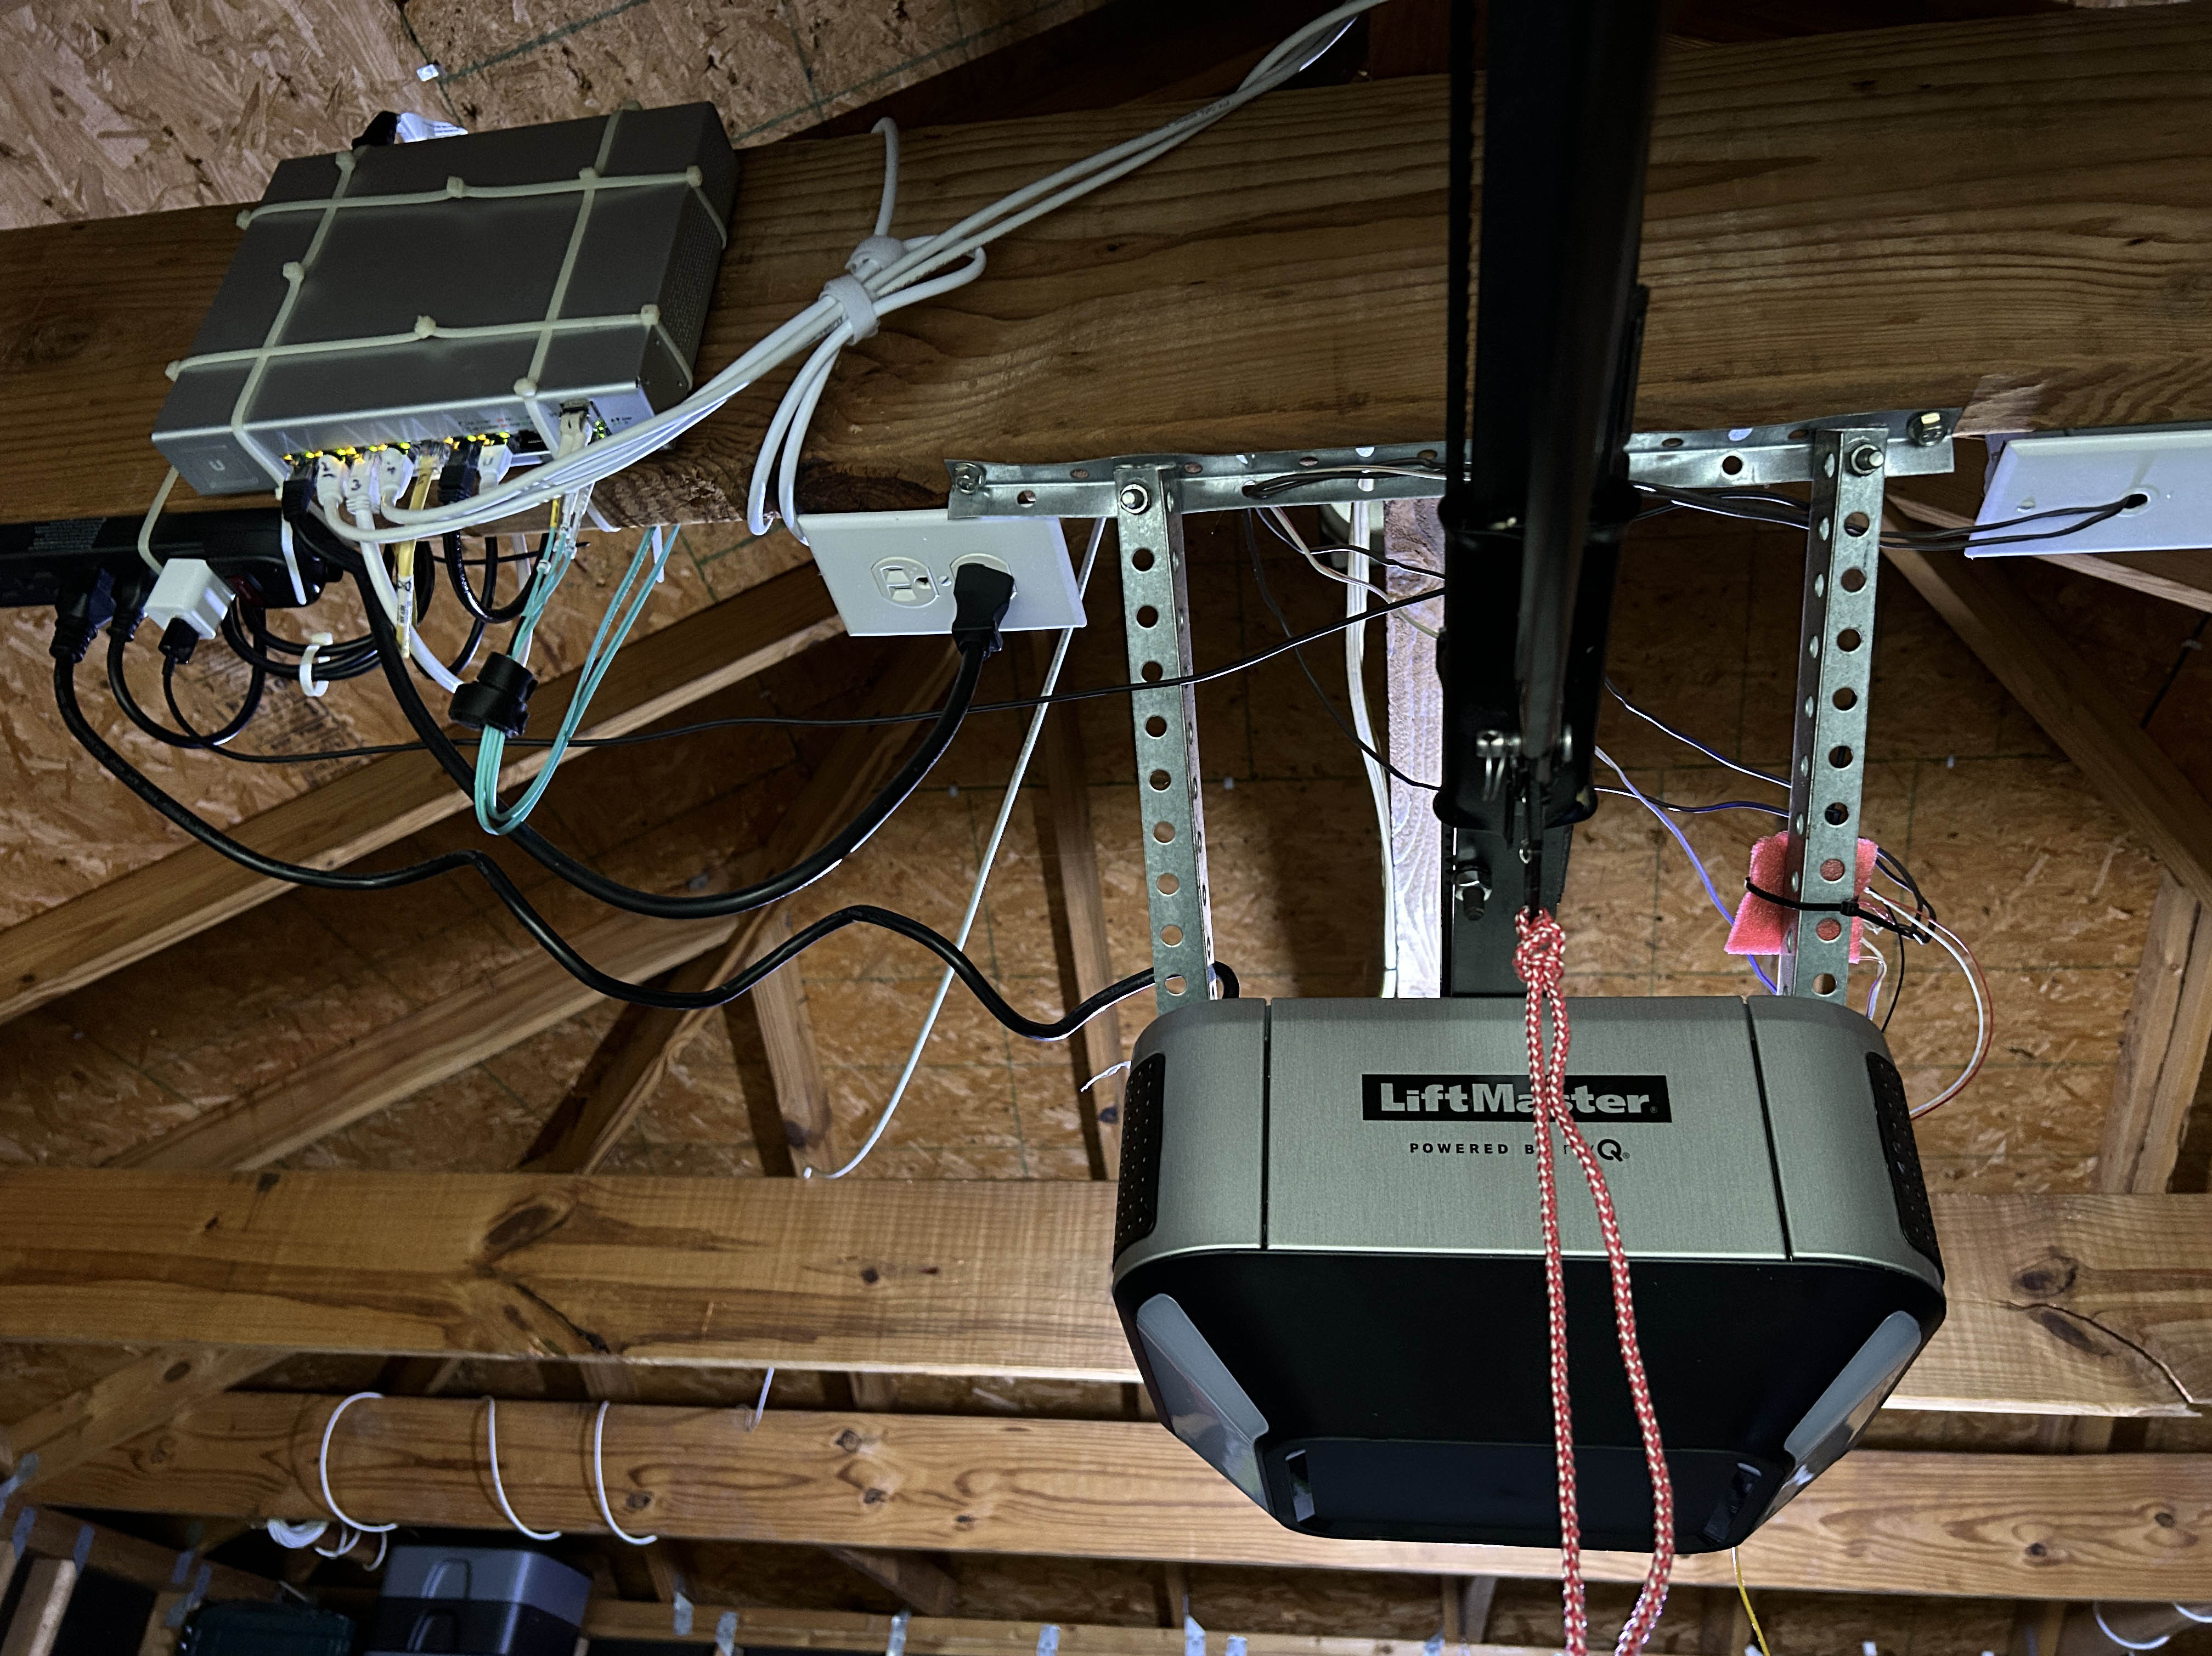
Enlarge/ The wiring panel on my garage door opener, before installing the ratgdo. The wires here lead from the door open switch and obstruction sensors to the opener. The ratgdo sits in between these wires and the garage door opener.
Lee Hutchinson
Getting it working
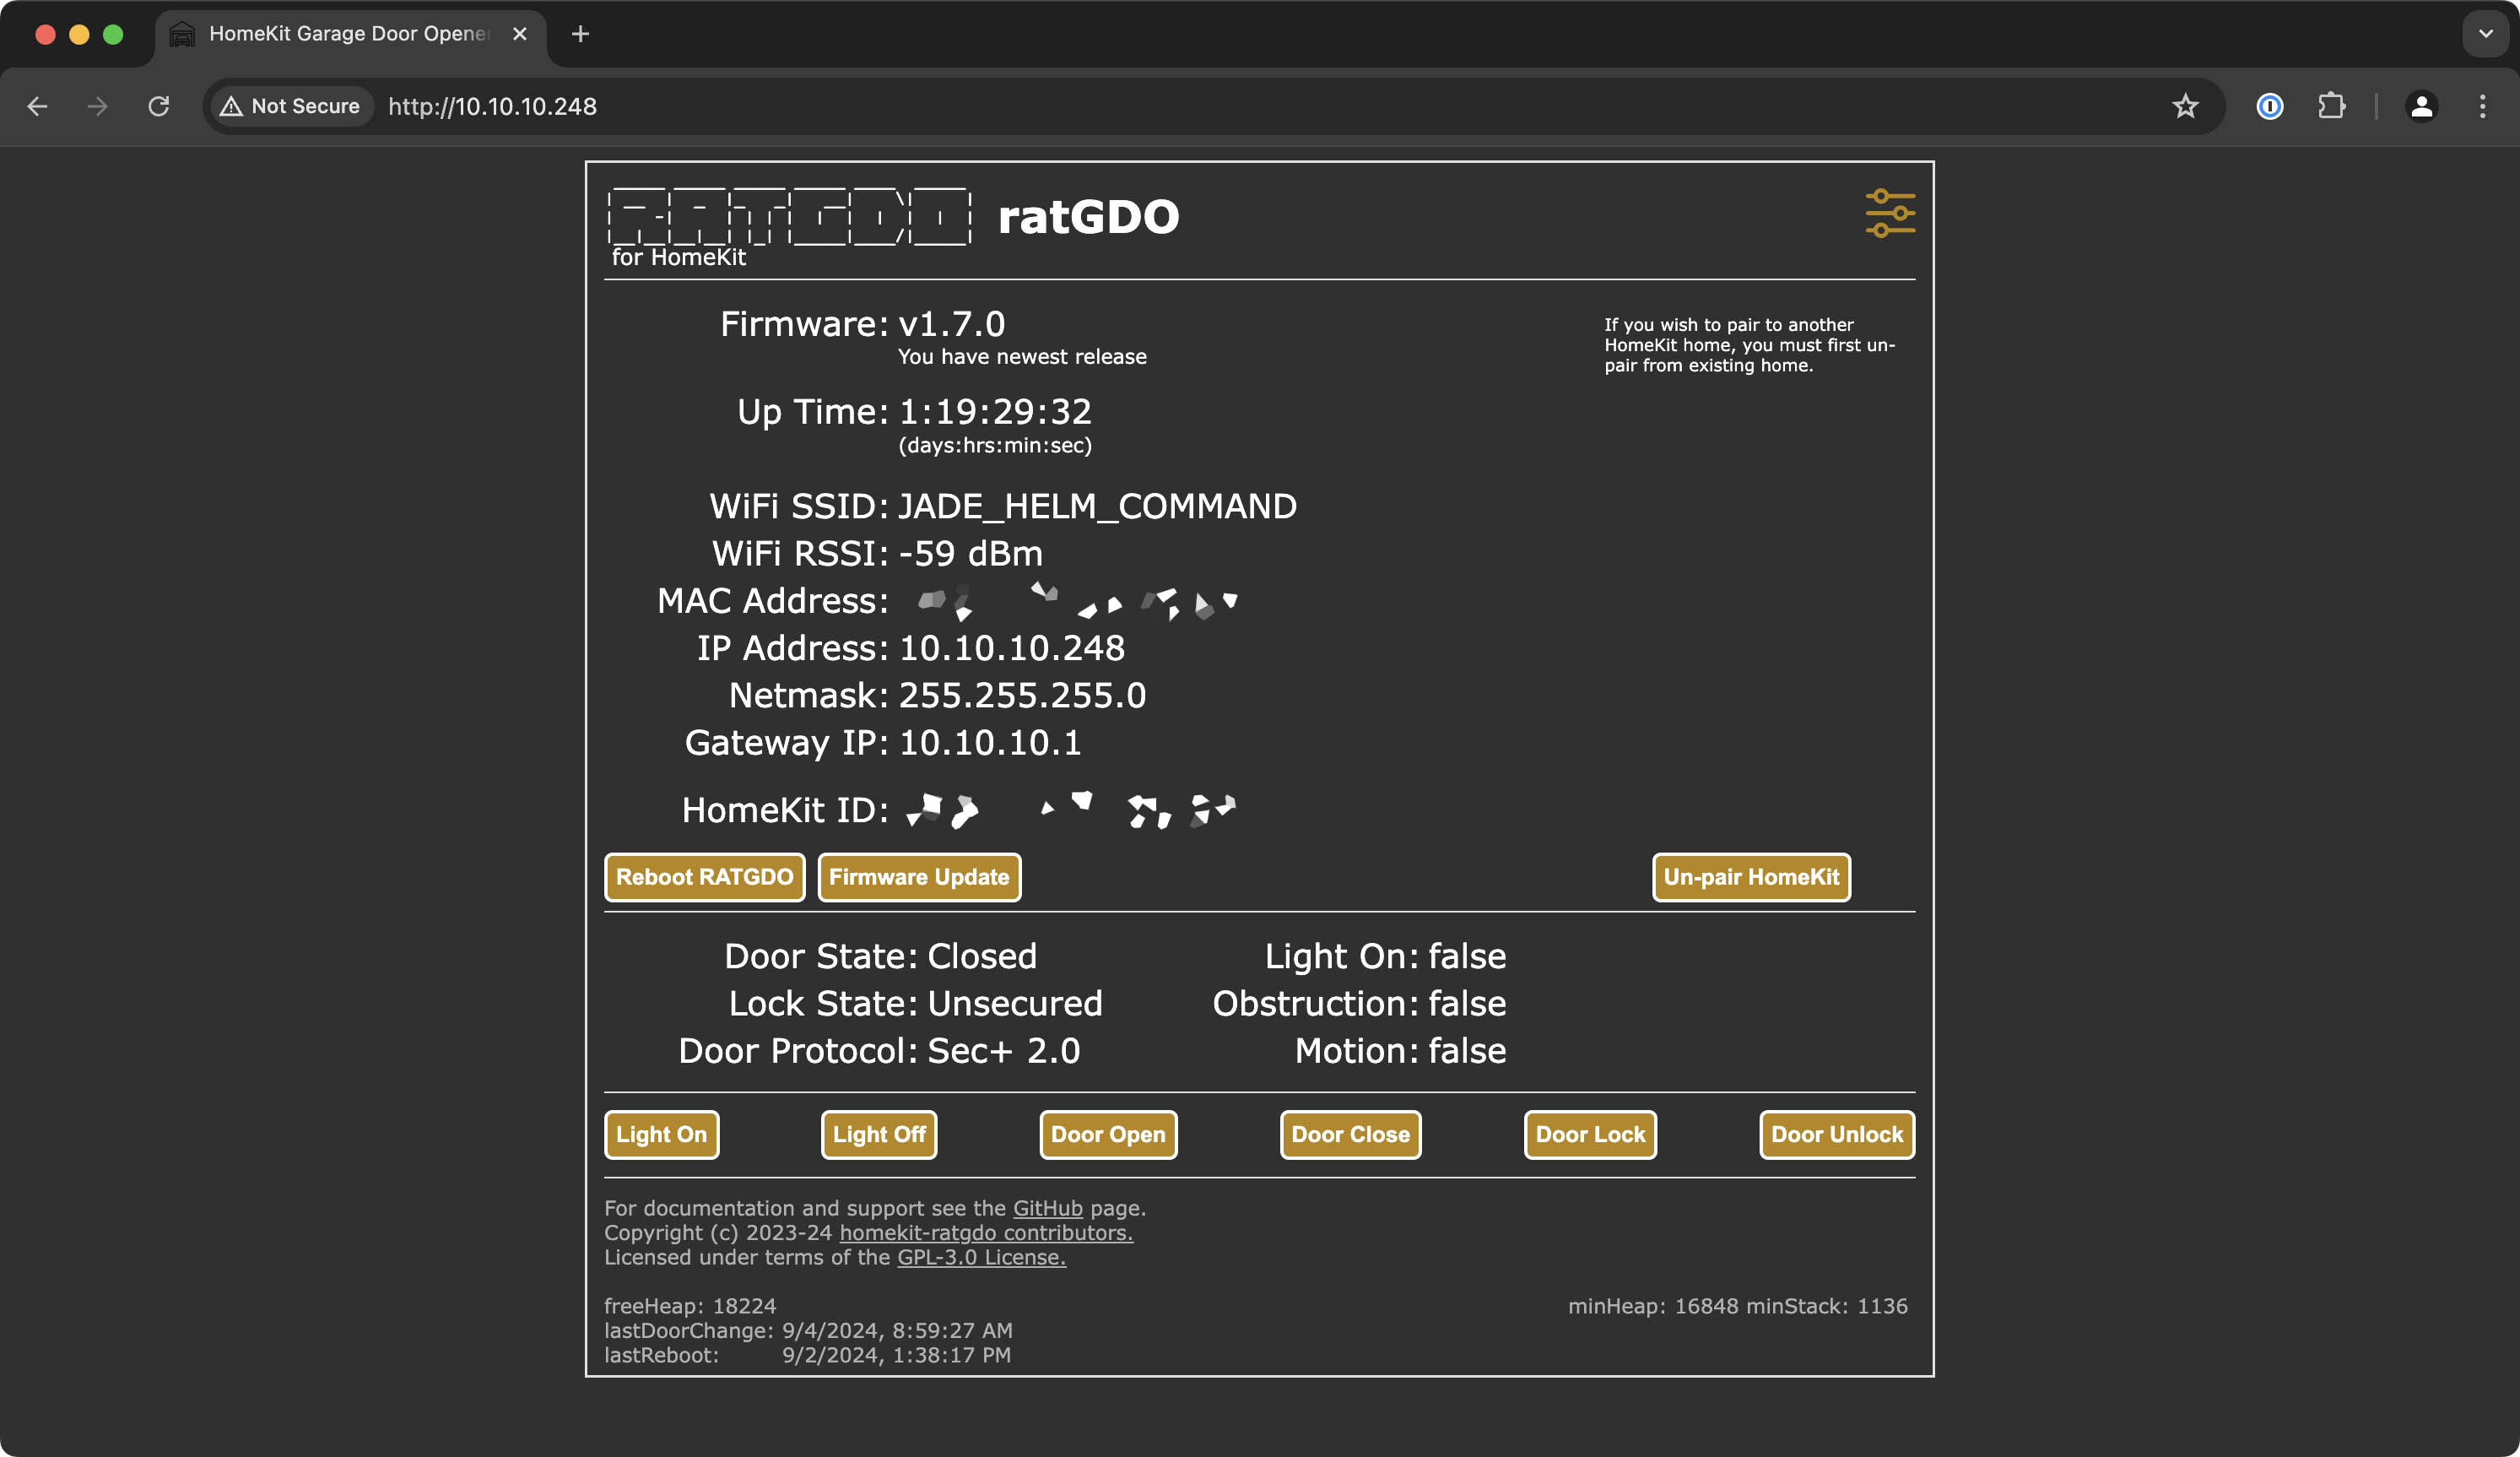
Given that I wanted to connect the ratgdo directly to HomeKit, the setup and installation paths were ludicrously easy. For the device itself, the first step was to flash it with a HomeKit-specific firmware image. This is done by plugging the ratgdo into a computer via USB, visiting this page in a compatible browser, and following the instructions that appear on the screen. After the firmware was blasted onto the device, the page produced a dialog box asking me if I wanted to join my home's Wi-Fi network. Once that was done, the ratgdo pulled an address via DHCP and was on the network.
The next step was to join the ratgdo to my HomeKit home. Continuing the theme of "ludicrously easy," all this required was navigating to the ratgdo’s IP address in a web browser and scanning the displayed QR code with the Home app.
Enlarge/ The ratgdo web interface. Prior to attaching the thing to my HomeKit home, there was a big ol' QR code at upper-right, which could be scanned to join the ratgdo to a HomeKit home. Which I did. Which is why it's not there in this image.
And that was it on the software side. My HomeKit home now said I had a garage door opener!
Physical wiring
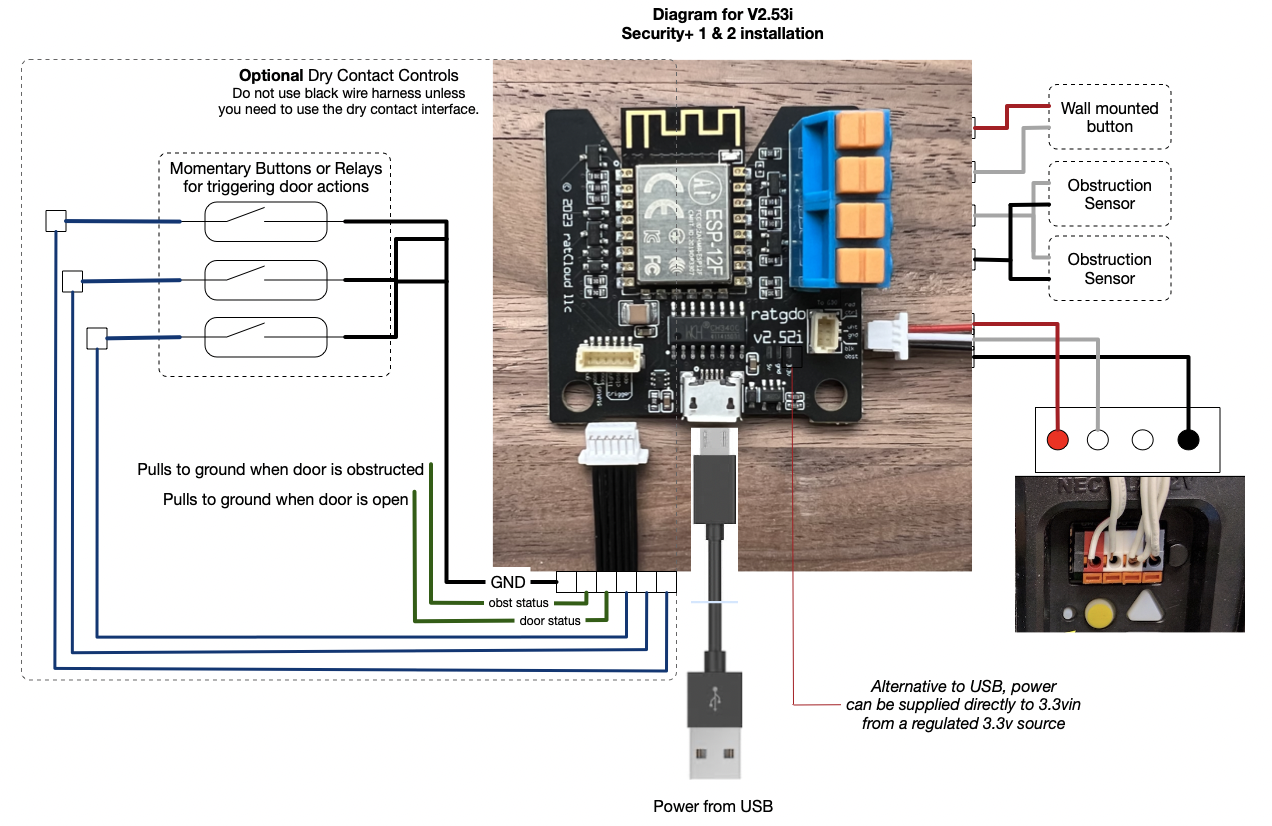
The physical side of setup was only slightly more involved, and even then, the ratgdo documentation was straightforward. The exact way to hook the ratgdo up to my opener was helpfully described in this diagram:
Enlarge/ How to connect a ratgdo to a garage door opener.
I went out to the garage, backed out one of the cars, and climbed my stepladder to reach the opener. My garage door opener had the expected number of wires coming in from the door sensors and switch, and plugging those wires into the ratgdo’s terminals took just a few seconds. Running wires from the ratgdo to the garage door opener’s terminals took a few more. The ratgdo draws power via its micro-USB connection, and it helpfully comes with a small 5-volt USB cube adapter, so plugging that in took several more seconds. Then I had to artfully zip-tie the ratgdo so it wouldn’t just dangle by its wires.
The total amount of ladder time was perhaps five minutes, with most of that time spent moving the ladder around so I could reach both the power plug and the wiring from a single spot without having to lean too far.
After climbing down from the ladder and making sure the open/close button on the wall still worked—it did!—I performed some functional validation.
"Hey, Siri," I said, invoking the ritual to summon the demon woman who dwells within the cosmic aether, "close the garage door."
With no fuss, no mess, and no ceremony, the garage door opener went whirrr and the door gently closed.
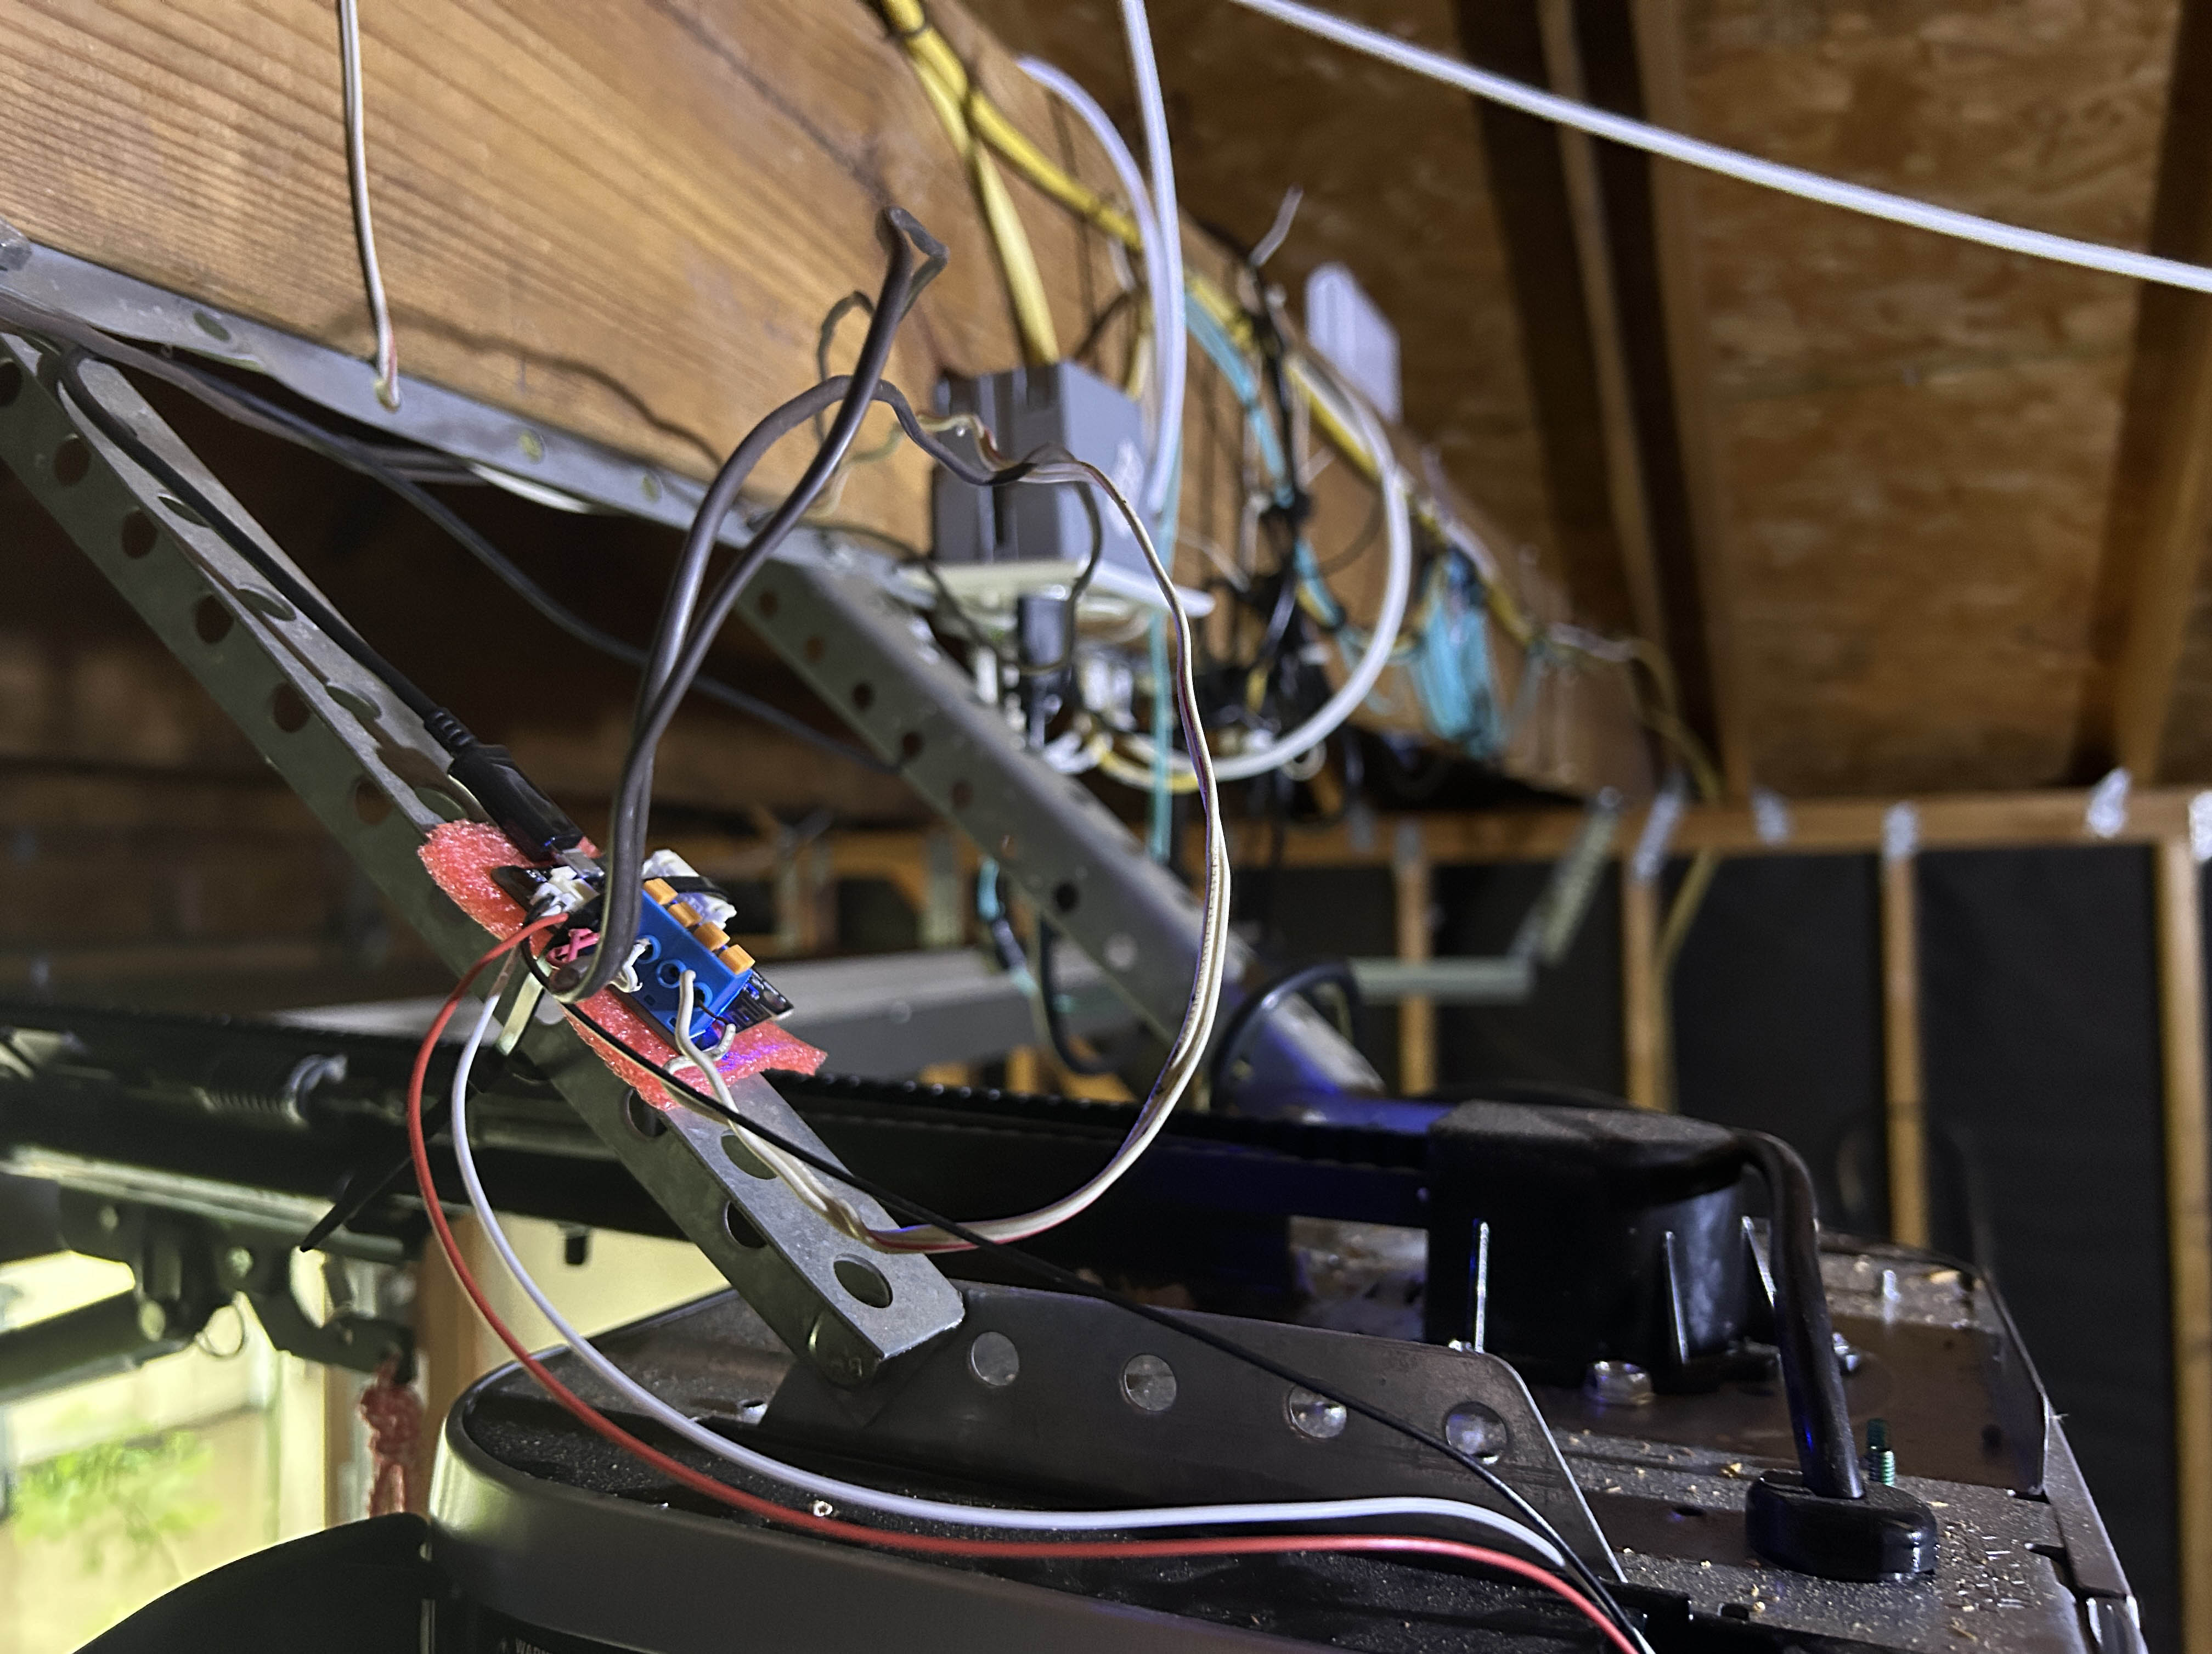
Enlarge/ Post-installation picture, showing (mostly) the mounting and wiring paths. Don't judge me.
Lee Hutchinson
Ahhh, sweet automation success.
Exactly what I wanted
The ratgdo works. I can speak my door-opening and door-closing spells into the air, and the demon Siri answers them without complaint; more, the demon even answers questions about the state of the garage door, which is really what I was after. I wish I’d bought a ratgdo years ago, because it does exactly what I want and does it locally, without spraying personal information out to my garage door opener’s manufacturer.
replaced last October.">replaced last October." src="https://cdn.arstechnica.net/wp-content/uploads/2024/09/ratgdo-setup.jpg" width="640" height="479" srcset="https://cdn.arstechnica.net/wp-content/uploads/2024/09/ratgdo-setup.jpg 2x">
Enlarge/ The ratgdo, sort of visible at frame right, zip-tied to a support. Visible at right is the Unifi 8-port switch I replaced last October.
Lee Hutchinson
Of course, while the ratgdo is indeed a local device, there’s still a large and obvious cloud dependency in my home automation setup: HomeKit itself.
I don’t know if I have it in me to divorce myself from HomeKit at this point—I feel like HomeKit and I have reached a comfortable détente. Upsetting the status quo might lead to war, and I don’t want a home automation war. Everything with HomeKit just kind of works at the moment, and upending that particular apple cart (apple cart! get it?!) feels like more hassle than I need in my life right now.
For now, I’m just enjoying the magic of functional home automation. A lot of things about the future suck, but being able to yell the garage door open or closed is pretty darn cool.
This article was originally published by ARS Techica - Tech. We only curate news from sources that align with the core values of our intended conservative audience. If you like the news you read here we encourage you to utilize the original sources for even more great news and opinions you can trust!
Postal ServiceYubNub Digital Media361 Patricia Drive New Smyrna Beach, FL 32168
E-mail admin@yubnub.digital
Follow Us
About
YubNub! It Means FREEDOM! The Freedom To Experience Your Daily News Intake Without All The Liberal Dribble And Leftist Lunacy!.
Our mission is to provide a healthy and uncensored news environment for conservative audiences that appreciate real, unfiltered news reporting. Our admin team has handpicked only the most reputable and reliable conservative sources that align with our core values.


Comments